
Published May 26, 2022 • Updated March 30, 2026
Reviewed by Julie Miller, BA in Language Arts, Editorial Lead, Dr. Killigan’s
TL;DR: To get rid of pantry moths, remove infested dry goods, clean the pantry thoroughly and use pantry moth traps to interrupt the breeding cycle. To prevent them from returning, store vulnerable foods in airtight containers, monitor high-risk areas and act quickly when new signs appear. Pantry moth control works best as a complete system, not a single fix.
Signs you may have pantry moths
- Small moths fluttering near dry goods, shelves or cupboards
- Webbing inside food packaging or along shelf corners
- Larvae in flour, cereal, rice, nuts, pet food or birdseed
- Clumped food, fine debris or unusual residue in stored goods
First 3 actions to take
- Throw away any food that shows clear signs of infestation
- Vacuum pantry shelves, corners, seams and shelf-pin holes
- Place Pantry Moth Traps near the affected storage area
What not to do
- Do not keep questionable food because only one package looks affected
- Do not rely on traps alone without removing contaminated goods
- Do not assume the problem is over just because you stop seeing adult moths for a few days
What are pantry moths and why do they keep coming back?
Pantry moths—specifically the Indian meal moth (Plodia interpunctella)—are highly adapted stored-food pests that often establish themselves long before the first adult is spotted. While most household insects require a nearby water source to survive, pantry moth larvae are biologically unique: they are metabolic water producers. They extract every drop of moisture they need directly from the dry carbohydrates they consume.
Because they don't need to leave their food source for hydration, they can spend their entire larval stage deeply embedded in your dry inventory. This specialized metabolism allows them to thrive in the desert-like conditions of a kitchen cabinet where other pests would perish.
They keep coming back because, in many homes, the visible moth is treated as the whole problem. In reality, the "moth" is simply the final, mobile stage of a life cycle, perfectly camouflaged within the hidden architecture of your storage space. Until the food source is removed and the structural "nooks" are cleared, the cycle continues.
Pantry moths vs. clothes moths: how to tell the difference
Before starting a treatment plan, it is vital to confirm which moth you are actually hosting. While they may look similar at a distance, pantry moths and clothes moths have entirely different biological needs and require different types of pheromone traps.
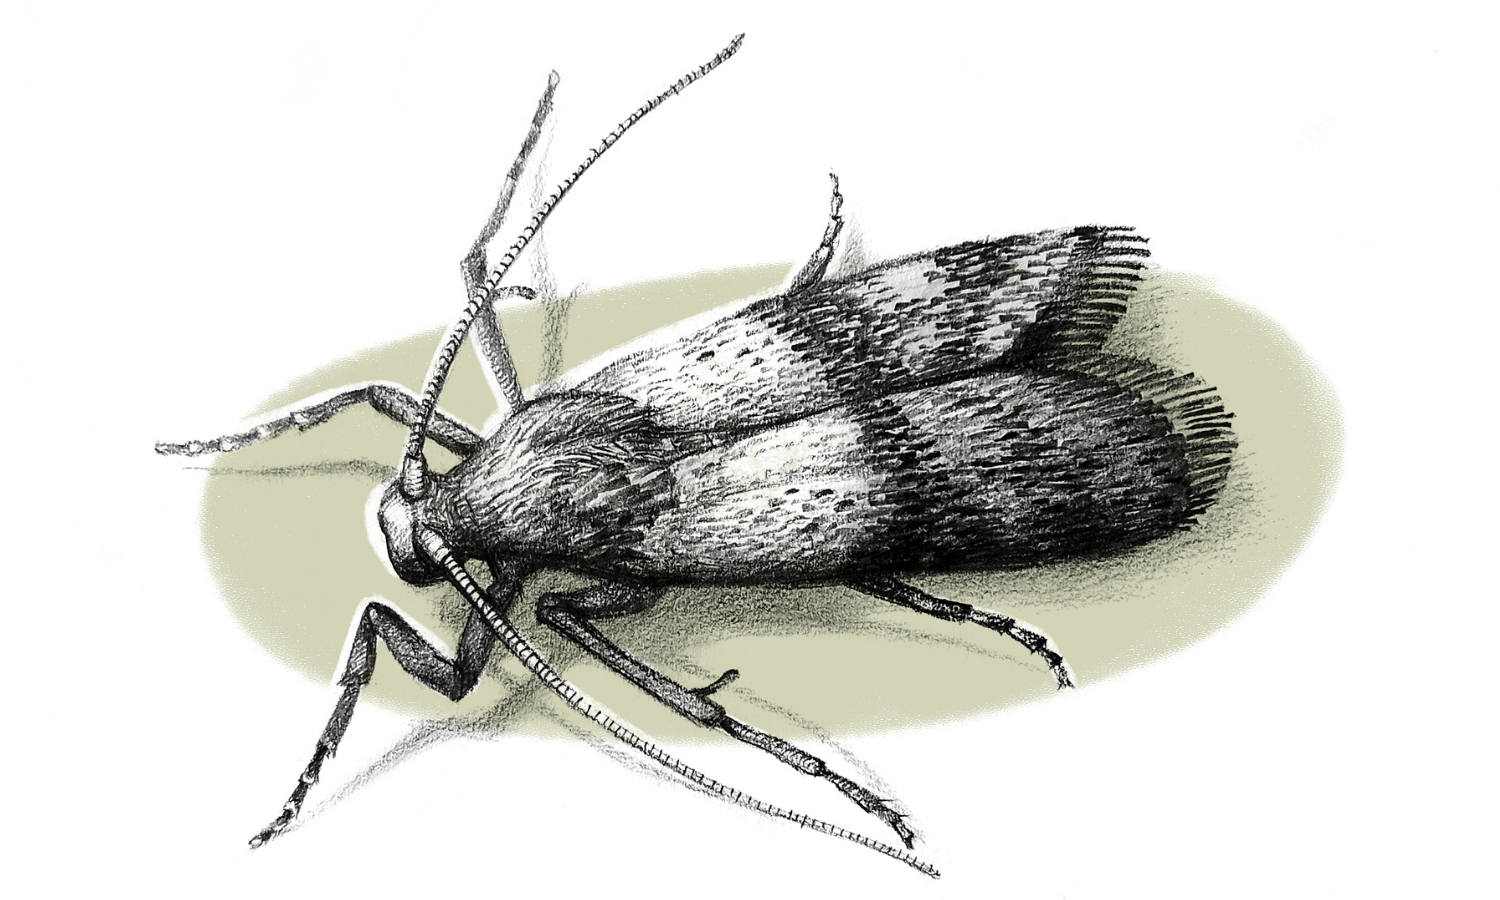
Pantry moths (usually the Indian meal moth) have a distinct two-toned appearance. Their wings are reddish-brown or copper on the outer half and a lighter, grayish-tan near the body. You will find them in kitchens, pantries and wherever dry goods are stored.
Clothes moths are smaller, monochromatic and usually a solid pale gold or buff color. They avoid the light and stay hidden in closets, wardrobes and drawers where they can feed on animal fibers like wool, silk or cashmere.
If you see moths fluttering in the kitchen, they are almost certainly pantry moths. Using a clothes moth trap in a pantry—or vice versa—will not work because the pheromone lures are specifically calibrated to attract only one species. For a deeper dive into identification, see Pantry moths vs. clothes moths.
Identifying the biological "fingerprints" of pantry moths
Once you have confirmed the species, the next step is to locate the specific patterns left behind in your food, on storage surfaces and in the air nearby. These signs confirm you are dealing with a localized, active infestation rather than a random visitor from outdoors.
Start by inspecting your dry goods for these specific signs:
- Silk and webbing: Look for fine, spider-like silk along the inner rims of jars, the folds of bags or the corners of boxes. Larvae produce this as they move and feed.
- Clumping together: If flour, grains or birdseed appear to be "clumping" together for no reason, it is often a sign of larval activity and waste.
- Migrating larvae: You may see small, off-white caterpillars crawling up walls or across ceilings. These are larvae searching for a high, dry "pupation site" to spin their cocoons.
What should you throw away?
The chewing science: Why high-risk staples fail. Start by inspecting your highest-risk pantry staples: flour, cereal, rice, grains, nuts, dried fruit, pet food and birdseed. Do not assume these items are safe just because the original plastic bag or cardboard box is unopened. Pantry moth larvae are equipped with specialized mouthparts capable of chewing through thin plastic film, wax paper, foil and cardboard.
If a package was stored directly beside an infested item, inspect it for tiny, pin-sized holes. If you see these points of entry, the product is compromised and must be disposed of. For help tracking down these overlooked sources, see Beyond breadcrumbs: 7 unexpected places you might find pantry moths.
The 7-day freezer test: Saving high-value items. For expensive or hard-to-replace dry goods that show no visible signs of webbing or clumping, you can use a thermal reset. To do this, place the item in an airtight container—such as a glass jar or a sturdy plastic bin with a rubber seal—and store it in the freezer for at least seven days at 0°F or colder.
This extended deep-freeze is a scientifically proven way to neutralize any microscopic eggs or early-stage larvae that may be present but invisible to the naked eye. If you want a fuller guide to the specific foods these pests target most often, see What do pantry moths eat?
How do you clean after pantry moths?
This is not a cosmetic reset; it is a structural decontamination.
Detail-first vacuuming. Begin by vacuuming every surface, focusing on shelf corners, seams, cracks and shelf-pin holes. Use a crevice tool to pull debris from the narrow gaps where surfaces meet, as these are the primary sites for pupation.
Critical step: Isolate the waste. Do not simply dump the vacuum canister into an indoor kitchen trash can. Pantry moth larvae are mobile and persistent; if left in an open indoor bin, they can easily crawl out and find a new hiding spot. Instead, empty the canister or remove the vacuum bag directly into a heavy-duty sealable plastic bag. Squeeze out the air, seal it tightly and take it immediately to an outdoor trash bin to ensure the larvae are physically removed from the home.
Decontaminating surfaces. Once the bulk debris is gone, you must strip away the sticky residues and microscopic eggs that cling to the shelves. Wipe down all surfaces, including the undersides of shelves and any shelf-pin holes, using a 50/50 mixture of distilled white vinegar and warm water. This solution disinfects the area and breaks down the organic matter that attracts moths. If you use shelf liners, remove and inspect them; if they are torn or peeling, replace them to eliminate hidden harboring sites.
Chemical disruption: Clearing the pheromone map. After the surfaces are dry, you must neutralize the invisible chemical trails (pheromones) that adult moths use to navigate and find mates. While a vinegar solution is a great prep step, Six Feet Under® provides a more robust finish.
Apply the spray to every structural surface, focusing on the "protected" gaps that allow an infestation to linger after the food is gone. Pay special attention to these overlooked points:
- underside of shelves and support brackets
- jar threads, bottle necks and lids
- hinges, door seals and the "hidden" backs of pantry doors
- the narrow tracks of sliding drawers
Expert Insight: Why ordinary cleaners fall short. Most household cleaners only remove visible dirt. Six Feet Under® uses a plant-powered blend of cinnamon and clove oils for dual-action results. It neutralizes larvae and microscopic eggs missed by the vacuum, while the aromatic oils 'scramble' the existing pheromone map. This disruption makes it impossible for stray adults to congregate or find the breeding sites they previously marked. Because the essential oil residue remains active on the surface, it provides a layer of residual protection for up to 30 days, ensuring that the structural "reset" continues to work long after your initial cleaning is finished.
How do pantry moth traps work?
Dr. Killigan's Pantry Moth Traps are not just collection devices; they are a biological "kill switch" designed to trigger a total population collapse. To grasp how they work, you must look at the specific reproductive behavior of the Indian meal moth.
Depending on your location, this species is also frequently called a meal, weevil, flour or grain moth and even the North American high-angle moth].
The role of pheromone nanotechnology. Female pantry moths release a specific sex pheromone to signal their readiness to mate. Male moths are biologically programmed to seek out this scent with incredible precision. Dr. Killigan’s Blue Stripe Formula—a double-potent moth pheromone attractant—is designed to lure and capture adult males more effectively.
This is species-specific nanotechnology. When you peel the back off a trap, it begins emitting a concentrated "call" that mimics a high density of females. The males are lured into the trap and permanently neutralized on the sticky surface. Because pheromone release and moth response take time, it is wise to give the traps several days before judging results.
Triggering a population collapse. The goal of a pheromone trap is to remove the males from the breeding pool. Since a single female can lay up to 400 eggs in her short lifetime, stopping just one mating encounter prevents hundreds of future larvae from entering your food supply.
By consistently capturing the males, you interrupt the reproductive cycle. Without a breeding partner, the remaining females cannot produce a viable next generation. This strategy of intercepting males is why Dr. Killigan’s Premium Pantry Moth Traps are trusted by hundreds of thousands of households to break the cycle without the use of broad-spectrum toxins.
Monitoring and maintenance. Used properly, these traps do two jobs at once: they suppress reproduction and give you a clear read on whether activity is still present. Once opened, they are effective for three months, though full traps should be replaced to maintain maximum pheromone draw. If the traps remain empty for a full 30-day cycle, it is a strong biological indicator that the breeding cycle has been broken.
Where should you place pantry moth traps?
To maximize the Pantry Moth Traps' effectiveness, you must consider the "scent map" of your kitchen. Placing a trap is not just about proximity to the food; it is about ensuring the pheromone "call" can reach the male moths without being blocked or diluted.
The science of airflow and navigation. Male moths navigate by flying upwind toward the highest concentration of pheromones. If a trap is tucked in a sealed bin or the back corner of an overcrowded shelf, the scent cannot circulate. For the best results, place traps at eye level on open shelving or the inside of a pantry door. This allows the pheromones to drift into the room's natural air currents, creating a clear trail for the moths to follow.
Pro tip: Harness the "bellows effect." Opening and closing a pantry door physically pushes the pheromone plume out into the room, making it much easier for "scout" moths to detect and follow the trail.
Creating a pheromone "web". To truly triumph over an infestation, you must create a pheromone web by strategically placing three traps in a triangular formation around your kitchen and storage areas. This ensures that no matter where a moth emerges, it is caught within a high-density "scent net" that pulls them toward the center of the room.
- Strategic levels: Place traps in both high and low areas (e.g., one on a top shelf and one near a lower pet food bin) to cover different flight paths.
- Avoid scent crowding: Avoid placing traps where they will compete with other strong aromas. Lavender sachets, essential oil diffusers and DIY herb bags can scramble the pheromone signal, confusing the moths and making your traps less effective.
- Finding the sweet spot: Don’t be afraid to move your trap locations every few days. If a trap is empty but you are still seeing moths, it may be in "dead air." Shift it a few feet until you find the location that yields the highest catch rate.
The trap as a "sentinel". Even after you stop seeing adult moths, the placement of a "sentinel trap" in a central location is your best defense against a secondary hatch. Think of this as a permanent watchman for your pantry; by keeping at least one trap active and visible, you ensure that any "strays" emerging from hidden pupation sites are intercepted before they can find a mate and restart the cycle.
For a deeper technical dive into height and specific room layouts, see Where to place moth traps to get rid of moths.
How long does it take to get rid of pantry moths?
It usually takes longer to get rid of pantry moths than most people expect. While you may see a dramatic drop in adult moth activity within the first 48 hours of placing traps, full control is a marathon, not a sprint. To manage your expectations, you must understand the metamorphosis lag.
The pupa stage: the "invisible" hurdle. Even after you have thrown away every infested bag of flour and vacuumed every shelf, the infestation is not necessarily over. Pantry moth larvae often migrate away from their food source to find a high, dry pupation site—such as the gap between the ceiling and the wall or the underside of a shelf bracket.
Once settled, they spin silk cocoons (pupae) that are protected from most surface cleaning. These pupae can remain in a dormant state for weeks, which is why a 'quiet week' can be a false sense of security; the next generation is simply maturing out of sight. To see how each stage of development impacts your timeline, see What is the life cycle of a pantry moth?
The variables of your recovery timeline. How quickly you reach "zero activity" is not a matter of luck; it is a calculation based on three critical factors. If your timeline feels stalled, one of these variables is likely the cause:
- Infestation depth (The scope): A single "source" package can be cleared in days. However, if larvae have migrated to structural cracks or ceiling corners, the timeline extends. You aren't just clearing food; you are waiting out the pupation cycle of "strays" hidden in the structure of the space.
- Structural decontamination (The precision): New moths will continue to emerge regardless of how much food you toss if silk or pupae remain in shelf-pin holes or hinges. Your recovery timeline is dictated by the thoroughness of your decontamination.
- The "ground zero" reset (The starting line): Your recovery clock does not start when you see the first moth; it starts only after the last contaminated item is removed. If one overlooked bag of birdseed or an open box of crackers remains, the breeding cycle simply resets to day one.
The 30 to 300-day window. The speed of the pantry moth life cycle is governed by two primary environmental factors: temperature and food availability. In a warm kitchen (around 80°F) with an abundant food source, the cycle from egg to adult can complete in as little as 30 days. However, in cooler environments (around 60°F) or if competition for food is high, larvae can enter diapause—a state of biological suspended animation. In these cooler, leaner conditions, the life cycle can stretch to 300 days.
This biological "elasticity" is why an infestation can seemingly disappear in winter and explode again in the spring. Due to this, you should not consider your pantry "clear" until you have seen zero activity for at least three to four consecutive weeks.
The timeline of decline. Rather than looking for "instant silence," look for a steady, measurable decline in your trap counts:
- Week 1: Peak activity as existing adults find the traps.
- Weeks 2–3: A noticeable "lull" as the initial generation dies off.
- Weeks 4–6: A potential small "second wave" of strays emerging from hidden cocoons.
- Month 2+: Occasional "sentinel" catches, followed by a total stop in activity.
The better expectation is consistent suppression, not an overnight fix. As long as you are using the full system—removing sources, deep cleaning with Six Feet Under® and maintaining your Pantry Moth Traps—the population will eventually collapse.
How do you prevent pantry moths from coming back?

Preventing pantry moths is a matter of maintaining a "biosecurity" mindset for your kitchen. By creating a mechanical and thermal barrier between the grocery store and your shelves, you ensure that any eggs that slip in never have the chance to spread.
The inspection gate: Checking new groceries. Most infestations begin at the processing plant or the grocery store, not in your home. To stop them at the door, establish an inspection gate. Before placing new dry goods into your pantry, look for pin-sized holes in plastic, fine webbing around jar lids or unusual clumping—the clear signs of a compromised package.
The gasket firewall: Why your packaging matters. Many people assume that if a bag of flour is rolled down and clipped, it is protected. From a biological perspective, it is not. True prevention requires a mechanical barrier. This means transitioning your dry goods into hard-sided containers made of glass, metal or thick, BPA-free plastic.
The most critical feature of these containers is a silicone or rubber gasket. This creates a true airtight seal that prevents microscopic eggs and newly hatched larvae from crawling through the threads of a standard screw-top lid. By decanting your groceries into gasket-sealed containers as soon as you bring them home, you create a "firewall." If one item arrives from the store with eggs inside, the infestation remains contained within that single jar rather than spreading to your entire inventory.
The thermal reset: Freezing as a final check. For high-risk bulk items or organic products, the 7-day freezer cycle is your ultimate biological filter. By subjecting new arrivals to sub-zero temperatures before they enter your sealed containers, you ensure that any 'hitchhikers' are neutralized at the door.
The prevention routine
- Rotate stock: Use the "First In, First Out" (FIFO) method to ensure older items don't sit in the back of the shelf for months.
- Wipe down shelves: Continue using Six Feet Under® as part of your maintenance schedule to disrupt any new navigation trails.
- Maintain sentinel traps: Keep one Pantry Moth Trap active in your main storage area as an early warning system to catch the first "scout" before it finds a mate.
When is a pantry moth bundle a better fit?
A pantry moth bundle is the better fit when the problem extends beyond one isolated package and starts to look like a pantry-wide cleanup. If you are seeing repeated activity across shelves, cupboards or multiple food-storage areas, a broader system usually makes more sense than relying on one tool alone. The goal is not to overcomplicate the fix. It is to match the solution to the scope of the problem.
A bundle can also be the better choice when you need to do more than monitor. In a broader pantry reset, Premium Pantry Moth Traps help interrupt reproduction over time, while Six Feet Under® provides kill-on-contact support and residual protection for up to 30 days on porous surfaces when used as directed. That makes the Kitchen Security Kit a stronger fit when activity is widespread, recurring or embedded in the pantry's architecture.
In short, a single-product approach can be enough for isolated incidents. But when an infestation is deep-seated or systemic, a bundle offers the most comprehensive path to a moth-free home.
Still feeling stuck?
Pantry moth infestations can feel larger than they are, especially when activity lingers longer than expected. If you need help choosing the right next step, Dr. Killigan’s Customer Experience team is here to help. You can contact us, email us at support@drkilligans.com or call us at (844) 525-2779.
Explore more
- Pantry moths vs clothing moths: How to tell the difference and why correct identification changes what you do next.
- What is the life cycle of a pantry moth?: How pantry moths move through each stage and why that cycle affects how long an infestation lasts.
- What do pantry moths eat?: What foods pantry moths target most often and which dry goods deserve the closest attention.
- How long does it take to get rid of pantry moths?: What timeline to expect and which factors usually speed up or slow down the process.
- Beyond Breadcrumbs: 7 unexpected places you might find pantry moths (and how to keep them out): Where pantry moths can hide beyond the obvious and how to track down overlooked sources.
- 8 ways to outsmart pantry moths: eggs, larvae and future prevention: How to deal with the stages you do not always see and how to reduce the chance of another infestation.
- Will eating a pantry moth make you sick?: What to know if pantry moths, larvae or contaminated food have already been found.


