

Published January 17, 2025 • Updated July 10, 2026
Reviewed by Julie Miller, BA in Language Arts, Editorial Lead, Dr. Killigan’s
TL;DR: To get rid of pantry moths, throw away infested dry goods, vacuum and clean pantry shelves and cracks and place pantry moth traps near the affected storage area. To help prevent them from returning, store vulnerable foods in airtight containers and continue monitoring for new activity.
This guide goes beyond traps. It walks through eight practical strategies for addressing pantry moths at every stage of their life cycle and helping prevent future infestations.
1. Know your enemy: Identify pantry moths

Before taking action, confirm that you are dealing with pantry moths rather than clothing moths or another pantry pest. Although they can look similar from a distance, pantry moths and clothing moths live in different areas, feed on different materials and require different pheromone traps.
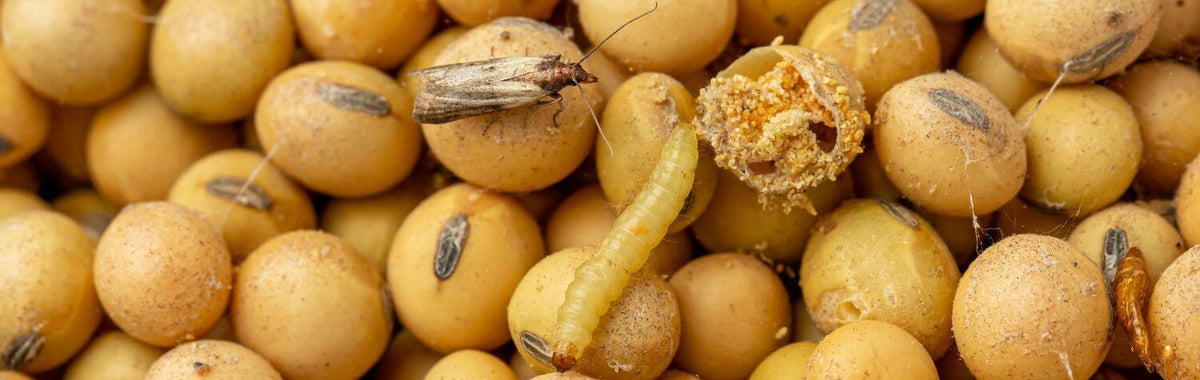
Pantry moths—often Indian meal moths—usually have two-toned wings. The area near the body is lighter and grayish-tan, while the outer portion is reddish-brown or copper. They are commonly found in kitchens, pantries and other areas where dry goods, pet food or birdseed are stored.
Clothing moths are typically smaller and more uniform in color, often appearing pale gold or buff. They tend to avoid light and remain hidden in closets, wardrobes and drawers where wool, silk, cashmere and other animal-based fibers are stored. Our guide to Pantry moths vs. clothing moths can help you compare the two before choosing a control method.
Correct identification matters because pantry moth traps and clothing moth traps use different species-specific pheromone lures. Using the wrong type of trap will not effectively monitor or capture the moths you are dealing with.
If you confirm that the problem is clothing moths, see Moth madness: 6 reasons why traps aren't enough (and how to completely eradicate clothing moths).
2. Spot the warning signs: Detect a pantry moth infestation
Adult moths flying near your pantry or cupboards are often the first sign of an infestation. Check for these other signs:
- Webbing: Fine, silk-like webbing inside food packages, around jar lids or along the corners of boxes. It can cause flour, grains, cereal or birdseed to clump together.
- Larvae: Small, cream-colored larvae inside food packages, on pantry shelves or crawling along nearby walls and ceilings.
- Damaged food and packaging: Small holes or tears in bags, boxes or other food packaging.
- Droppings: Tiny dark droppings inside food packages or on pantry shelves.
- Unusual odors: A stale or unpleasant odor coming from dry goods.
3. End the infestation: Eliminate every life stage

Pantry moths move through four life stages: eggs, larvae, pupae and adults. Addressing each stage is important because if even one is missed, the infestation can continue.
- Eggs: Remove infested food and clean pantry shelves, cracks and packaging seams where eggs may be hidden.
- Larvae: Dispose of contaminated dry goods, remove webbing and vacuum any larvae found on shelves, walls or ceilings.
- Pupae: Vacuum corners, shelf brackets, hinges and wall-ceiling joints where mature larvae may form cocoons.
- Adults: Use pantry moth traps to capture adult males and help interrupt the breeding cycle.
For more detail on timing and development, see What is the life cycle of a pantry moth?
4. Find the source: Locate infested food
Pantry moths lay their eggs directly on or near stored food so newly hatched larvae can begin feeding immediately. Finding and removing the infested food source is the first and most important step. If the source remains, pantry moths will continue to develop regardless of how many adults are trapped.
Common sources include:
- Flour
- Rice
- Cereal
- Pasta
- Oats
- Nuts
- Dried fruit
- Baking mixes
- Pet food
- Birdseed
Tip: Do not assume unopened food is unaffected. Pantry moth larvae can chew through thin plastic, paper and cardboard packaging, allowing infestations to spread to products that appear sealed.
For a more complete list of foods pantry moths infest, see What do pantry moths eat?
Featured in this article
Shop Dr. Killigan's Essentials


5. Use pheromone traps: Interrupt the breeding cycle
Dr. Killigan’s Pantry Moth Traps use species-specific pheromones to attract and capture adult male pantry moths. By reducing the number of males available to mate, the traps help interrupt the breeding cycle.
Place traps in an open area near the affected pantry or food-storage area, such as an open shelf or on the inside of a pantry door. Avoid hiding traps behind tightly packed items or inside sealed containers where the pheromones cannot circulate.
For detailed placement guidance, see Where do I place moth traps to get rid of moths?

6. Monitor your progress: Track pantry moth activity
Check your pantry moth traps regularly and note whether catches increase or decrease over time.
- More moths: A sudden increase may point to an overlooked food source or newly emerging adult moths.
- Fewer moths: A steady decline suggests that your cleaning, trapping and treatment efforts are reducing activity.
- No catches: If a trap remains empty but you continue to see moths, move it to another open location near the affected pantry or food-storage area.
Pantry moth control can take several weeks or months, depending on the severity of the infestation and whether hidden eggs, larvae or pupae remain. Continue monitoring until there are no new signs of activity. For a fuller timeline, see How long does it take to get rid of pantry moths?
7. Clean the pantry: Remove hidden eggs, larvae and pupae
After removing the infested food source, empty the pantry completely so you can reach every shelf, corner and crevice.

- Empty the storage area: Remove food, cans, jars, shelf organizers and other items from cupboards and pantry shelves.
- Vacuum every crevice: Use a vacuum with a crevice attachment to clean shelf edges, corners, shelf-pin holes, hinges, brackets, mounting hardware, baseboards and the undersides of shelves. These protected areas are common places for mature larvae to spin cocoons before emerging as adult moths.
- Dispose of the vacuum contents outdoors: Empty the canister or remove the vacuum bag into a sealable bag, close it tightly and place it in an outdoor trash bin.
- Wipe every surface: Clean shelves, pantry walls, jars and storage containers with a 50/50 mixture of distilled white vinegar and warm water to remove food residue, webbing and other debris that vacuuming may leave behind.
- Apply Six Feet Under®: After the pantry is empty, clean and dry, apply Six Feet Under® to porous surfaces for residual protection lasting up to 30 days. Focus on cracks, corners and other protected areas where pupae may be hidden and adult moths may later emerge.
- Check shelf liners: Remove torn, peeling or heavily soiled liners that may conceal pantry moth eggs or larvae.
- Restock carefully: Return only food that has been carefully inspected and, whenever possible, transferred into airtight containers to help reduce the risk of another infestation.
Why this matters: Cleaning and vacuuming remove food residue, webbing and visible pantry moth activity, but they may not remove every egg or larva. Six Feet Under® is a fast-acting, plant-powered contact killer made with ingredients including soybean oil and clove oil. Applied after cleaning, it helps eliminate eggs and larvae that may remain.
8. Prevent future infestations: Protect your pantry
Once the infestation is under control, use these habits to reduce the chance of pantry moths returning:
- Store dry goods securely: Transfer dry goods into hard-sided containers with tight-fitting lids. Containers with silicone or rubber gaskets create a stronger barrier than rolled bags, clips or lightweight packaging. They can also help contain an infestation if a newly purchased product already has eggs or larvae inside.
- Inspect new groceries: Check packages for small holes, webbing, clumping or damaged seals before placing them in the pantry.
- Freeze questionable items: Place dry goods that appear unaffected but may have been exposed to pantry moths in an airtight container and freeze them at 0°F for at least seven days.
- Protect spices and small packages: Transfer spices and other small dry goods into sealed containers, or store them in the refrigerator or freezer.
- Store pet food and birdseed carefully: Keep these high-risk foods in tightly sealed containers and inspect them regularly.
- Be mindful of edible decorations: Choose twig or evergreen wreaths instead of decorations made with seeds, grains or dried fruit. Keep edible decorations outdoors so they do not become a food source for pantry moths.
- Keep traps active: Continue using Pantry Moth Traps to monitor for new adult activity.
- Maintain the pantry: Clean spills promptly, vacuum crumbs and inspect stored foods regularly.
For deeper answers on food disposal, the freezer test, trap performance and recovery timelines, see our guide to why pantry moths keep coming back and how to prevent them.
For both the monitoring traps and the spray in one purchase, see the Kitchen Security Kit.
Take back your pantry

Getting rid of pantry moths takes more than setting a trap. Lasting control comes from removing the infested food source, cleaning thoroughly, interrupting the breeding cycle and continuing to monitor until there are no new signs of activity.
By following these eight steps, you can eliminate an active infestation and help prevent future outbreaks.
When you’re ready to take the next step, explore Dr. Killigan’s pantry moth collection for traps and treatment options designed to support your pantry moth control plan.
A little vigilance goes a long way. Inspect new groceries, store dry goods in airtight containers and keep monitoring your pantry so small problems never become large infestations.
Explore more
-
Why pantry moths keep coming back (and how to prevent them)
(Deeper answers on persistence, food disposal and long-term prevention.)
-
Where do I place moth traps to get rid of moths?
(Learn where to place pantry moth traps for the strongest catches and fastest results.) -
What is the life cycle of a pantry moth?
(Understand how pantry moths develop from eggs to adults—and why every life stage matters.) -
How long does it take to get rid of pantry moths?
(See what to expect during treatment and why complete control can take several weeks.) -
What do pantry moths eat?
(Discover the foods pantry moths infest most often and where to look first.) -
Where do pantry moths hide? 7 overlooked places most people miss
(Learn where pantry moths hide beyond the pantry and how to stop recurring infestations.) -
Pantry moths vs. clothing moths
(Compare the two species so you can choose the right trap and treatment.) -
Will eating a pantry moth make you sick?
(Learn what pantry moth contamination means for your food and your family's health.)
Related: How to kill pantry moths